
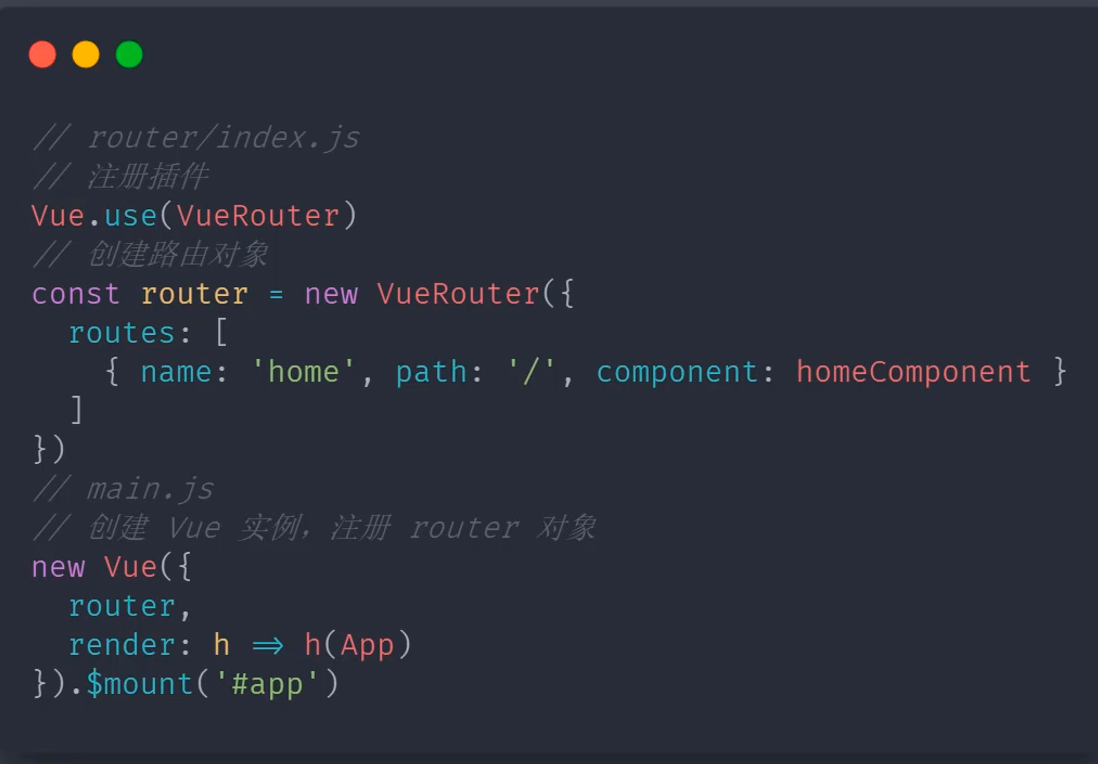
Vue-Router 实现原理
...大约 4 分钟
Hash 模式 和 History 模式
表现形式的区别
- Hash 模式
https://music.163.com/#/playlist?id=3102961863 - History 模式
https://music.163.comlplaylist/3102961863
原理的区别
hash 模式
Vue Router 默认使用的是hash模式,使用hash来模拟一个完整的 URL,通过onhashchange监听路径的变化History 模式
通过
history.pushState()方法改变地址栏监听
popstate事件根据当前路由地址找到对应组件重新渲染
history.pushState()
history.replacestate()
history.go()
相关信息
本地配置 history 模式不会报错,是因为Vue-cli 自带的服务器已经帮我们配置好了
History 对应后端的配置
Nodejs 环境
const path = require('path')
// 导入处理 history 模式的模块
const history = require('connect-history-api-fallback')
// 导入 express
const express = require('express')

const app = express()
// 注册处理 history 模式的中间件
app.use(history())
// 处理静态资源的中间件,网站根目录 ../web
app.use(express.static(path.join(__dirname, '../web')))

// 开启服务器,端口是 3000
app.listen(3000, () => {
  console.log('服务器开启,端口:3000')
})
nginx 环境配置
nginx 相关命令
# 启动
start nginx
# 重启
nginx -s reload
# 停止
nginx -s stop
修改 nginx 配置文件

  location / {
            root   html;
            index  index.html index.htm;
            try_files $uri $uri/ /index.html;
        }
重启 nginx
nginx -s reload
注意
修改配置文件后需要重启才能生效,且修改的不是默认的配置文件。
执行过程
浏览器向服务器去请求这个地址,nginx 服务器接受到这次请求之后,回去找请求路径对应的文件,当找不到文件时,会根据配置文件中的 try_files选项去依次查找,如果还找不到,会默认返回网站根目录的 index.html。浏览器接受到这个网页之后,会在客户端去解析所对应的组件
实现原理
前置知识
- 插件
- 混入
- Vue.observable
- 插槽
- render 函数
- 运行时和完整版的 Vue
Vue Router 的使用方式
Vue 的构建版本
- 运行时版:不支持 template 模板,需要打包的时候提前编译
- 完整版:包含运行时和编译器,体积比运行时版大10K左右,程序运行的时候把模板转换成 render 函数
相关信息
Vue-cli 默认安装的 vue 版本不包含编译器,单文件组件中的模版需要编译后才能展示。可以在 vue.config.js中配置使用包含编译器的vue,如下:
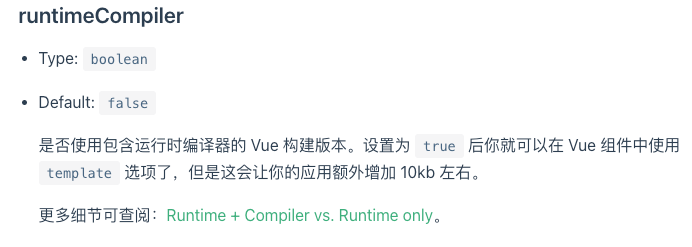
module.exports = {
  runtimeCompiler: true
}
不使用编译器渲染视图- h 函数
 Vue.component("router-link",{
            props:{
                to:String
            },
            // 运行时版本不支持 template 选项
            // template: '<a :href="to"><slot></slot>></a>',
            render(h){
                return h("a",{
                    attrs:{ // 标签属性(dom对象)
                        href:this.to
                    },
                    on:{
                        click:this.clickhander
                    }
                },[this.$slots.default])
            },
            methods:{
                clickhander(e){
                    history.pushState({},"",this.to)
                    this.$router.data.current=this.to
                    e.preventDefault()
                }
            }
        })
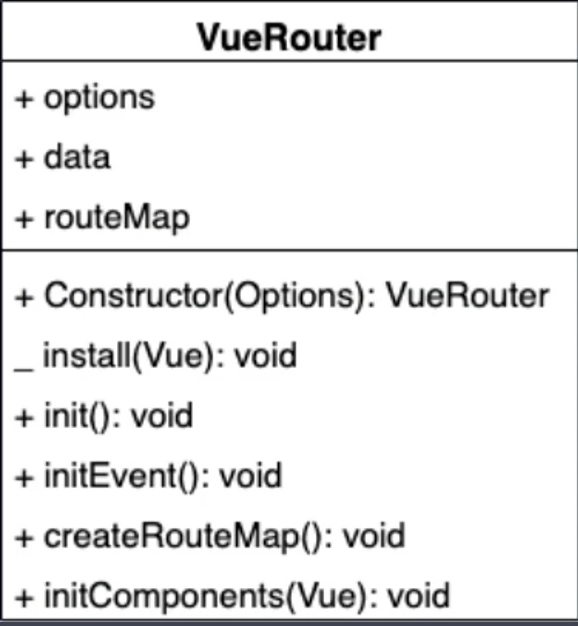
实现思路
- 创建 LVueRouter 插件,静态方法 install
- 判断插件是否已经被加载
- 当 Vue 加载的时候把传入的 router 对象挂载到 Vue 实例上(注意:只执行一次)
- 创建 LVueRouter 类
- 初始化,options、 routeMap、app(简化操作,创建 Vue 实例作为响应式数据记录当前路径)
- initRouteMap( 遍历所有路由信息,把组件和路由的映射记录到 routeMap 对象中
- 注册 popstate 事件,当路由地址发生变化,重新记录当前的路径
- 创建 router-link 和 router-view 组件
- 当路径改变的时候通过当前路径在 routerMap 对象中找到对应的组件,渲染 router-view
install
export default class VueRouter {
  static install (Vue) {
    // 如果插件已经安装直接返回
    if (VueRouter.install.installed && _Vue === Vue) return
    VueRouter.install.installed = true
    _Vue = Vue
    Vue.mixin({
      beforeCreate () {
        // 判断 router 对象是否已经挂载了 Vue 实例上
        if (this.$options.router) {
          // 把 router 对象注入到 Vue 实例上
          _Vue.prototype.$router = this.$options.router
        }
      }
    })
  }
}
构造函数
constructor(options) {
  	// 记录配置选项
    this.options = options;
  	// 记录路径和相应的配置
    this.routeMap = {};
    // 利用 observable 创建响应式对象
    this.data = _Vue.observable({
      current: "/" // 当前的路由地址
    });
  	// 初始化
    this.init();
  }
createRouteMap
 createRouteMap() {
    //遍历所有的路由规则 把路由规则解析成键值对的形式存储到routeMap中
    this.options.routes.forEach((route) => {
      this.routeMap[route.path] = route.component;
    });
  }
initComponent-初始化路由组件
 initComponent(Vue) {
    // <router-link to="/">Home</router-link>
    Vue.component("router-link", {
      props: {
        to: String
      },
      // 运行时版本不支持 template 选项
      // template: '<a :href="to"><slot></slot>></a>',
      render(h) {
        return h(
          "a",
          {
            attrs: {
              // 标签属性(dom对象)
              href: this.to
            },
            on: {
              click: this.clickhander
            }
          },
          [this.$slots.default]
        );
      },
      methods: {
        clickhander(e) {
          // 改变路由地址,不会向服务器发送请求
          history.pushState({}, "", this.to);
          // 响应式对象,修改数据后会重新加载对应的组件
          this.$router.data.current = this.to;
          // 阻止默认事件
          e.preventDefault();
        }
      }
      // template:"<a :href='to'><slot></slot><>"
    });
    const self = this;
    Vue.component("router-view", {
      render(h) {
        // self.data.current
        const cm = self.routeMap[self.data.current];
        return h(cm);
      }
    });
  }
initEvent
监测路由的前进与后退事件,修改响应式对象,从而刷新视图
 initEvent() {
    window.addEventListener("popstate", () => {
      this.data.current = window.location.pathname;
    });
  }
init
  init() {
    this.createRouteMap();
    this.initComponent(_Vue);
    this.initEvent();
  }
Powered by Waline v3.3.0