
响应式原理
...大约 8 分钟
数据驱动
数据响应式
数据模型仅仅是普通的 JS 对象,而当我们修改数据时,视图会进行更新,避免了繁琐的 DOM 操作,提高了开发效率
双向绑定
- 数据改变,视图改变;视图改变,数据也随之改变
- 在 vue 中,我们通过 v-model 在表单元素上创建双向绑定
数据驱动
- vue 最独特的特性之一
- 开发过程中仅需要关注数据(业务)本身,不需要关心数据是如何渲染到视图的
响应式核心原理
Vue2.x
- Vue 2.x深入响应式原理
- MDN Object.defineProperty
- 浏览器兼容IE8以上(不兼容IE8)
<!DOCTYPE html>
<html lang="en">
<head>
  <meta charset="UTF-8">
  <meta name="viewport" content="width=device-width, initial-scale=1.0">
  <meta http-equiv="X-UA-Compatible" content="ie=edge">
  <title>defineProperty 多个成员</title>
</head>
<body>
  <div id="app">
    hello
  </div>
  <script>
    // 模拟 Vue 中的 data 选项
    let data = {
      msg: 'hello',
      count: 10
    }

    // 模拟 Vue 的实例
    let vm = {}

    proxyData(data)

    function proxyData(data) {
      // 遍历 data 对象的所有属性
      Object.keys(data).forEach(key => {
        // 把 data 中的属性,转换成 vm 的 setter/setter
        Object.defineProperty(vm, key, {
          enumerable: true,
          configurable: true,
          get () {
            console.log('get: ', key, data[key])
            return data[key]
          },
          set (newValue) {
            console.log('set: ', key, newValue)
            if (newValue === data[key]) {
              return
            }
            data[key] = newValue
            // 数据更改,更新 DOM 的值
            document.querySelector('#app').textContent = data[key]
          }
        })
      })
    }

    // 测试
    vm.msg = 'Hello World'
    console.log(vm.msg)
  </script>
</body>
</html>
Vue3.x
- MDN Proxy
- 直接监听对象,而非属性。
- ES6中新增,IE 不支持,性能由浏览器优化
<!DOCTYPE html>
<html lang="en">
<head>
  <meta charset="UTF-8">
  <meta name="viewport" content="width=device-width, initial-scale=1.0">
  <meta http-equiv="X-UA-Compatible" content="ie=edge">
  <title>Proxy</title>
</head>
<body>
  <div id="app">
    hello
  </div>
  <script>
    // 模拟 Vue 中的 data 选项
    let data = {
      msg: 'hello',
      count: 0
    }

    // 模拟 Vue 实例
    let vm = new Proxy(data, {
      // 执行代理行为的函数
      // 当访问 vm 的成员会执行
      get (target, key) {
        console.log('get, key: ', key, target[key])
        return target[key]
      },
      // 当设置 vm 的成员会执行
      set (target, key, newValue) {
        console.log('set, key: ', key, newValue)
        if (target[key] === newValue) {
          return
        }
        target[key] = newValue
        document.querySelector('#app').textContent = target[key]
      }
    })

    // 测试
    vm.msg = 'Hello World'
    console.log(vm.msg)
  </script>
</body>
</html>
发布订阅模式
- 事件中心
- 发布者(注册-)
- 订阅者(触发-)
vue 中的自定义事件
<!DOCTYPE html>
<html lang="en">

<head>
  <meta charset="UTF-8">
  <meta name="viewport" content="width=device-width, initial-scale=1.0">
  <title>Vue 自定义事件</title>
</head>

<body>
  <script src="./js/vue.js"></script>
  <script>
    // Vue 自定义事件
    let vm = new Vue()
    // { 'click': [fn1, fn2], 'change': [fn] }

    // 注册事件(订阅消息)
    vm.$on('dataChange', () => {
      console.log('dataChange')
    })

    vm.$on('dataChange', () => {
      console.log('dataChange1')
    })
    // 触发事件(发布消息)
    vm.$emit('dataChange')
  </script>
</body>

</html>
代码实现
<!DOCTYPE html>
<html lang="cn">

<head>
  <meta charset="UTF-8">
  <meta name="viewport" content="width=device-width, initial-scale=1.0">
  <title>发布订阅模式</title>
</head>

<body>
  <script>
    // 事件触发器
    class EventEmitter {
      constructor() {
        // { 'click': [fn1, fn2], 'change': [fn] }
        this.subs = Object.create(null)
      }

      // 注册事件
      $on(eventType, handler) {
        // 保证事件的类型是数组类型
        this.subs[eventType] = this.subs[eventType] || []
        // 存储事件到事件中心
        this.subs[eventType].push(handler)
      }

      // 触发事件
      $emit(eventType) {
        if (this.subs[eventType]) {
          this.subs[eventType].forEach(handler => {
            handler()
          })
        }
      }
    }

    // 测试
    let em = new EventEmitter()
    em.$on('click', () => {
      console.log('click1')
    })
    em.$on('click', () => {
      console.log('click2')
    })

    em.$emit('click')
  </script>
</body>

</html>
观察者模式
与发布订阅模式的区别
- 没有事件中心
- 发布者需要知道订阅者的存在
相关概念
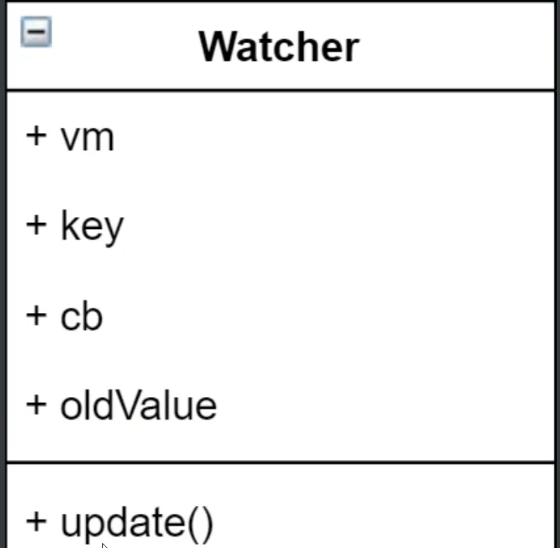
- 观察者(订阅者) -- Watcher
- update():当事件发生时,具体要做的事情
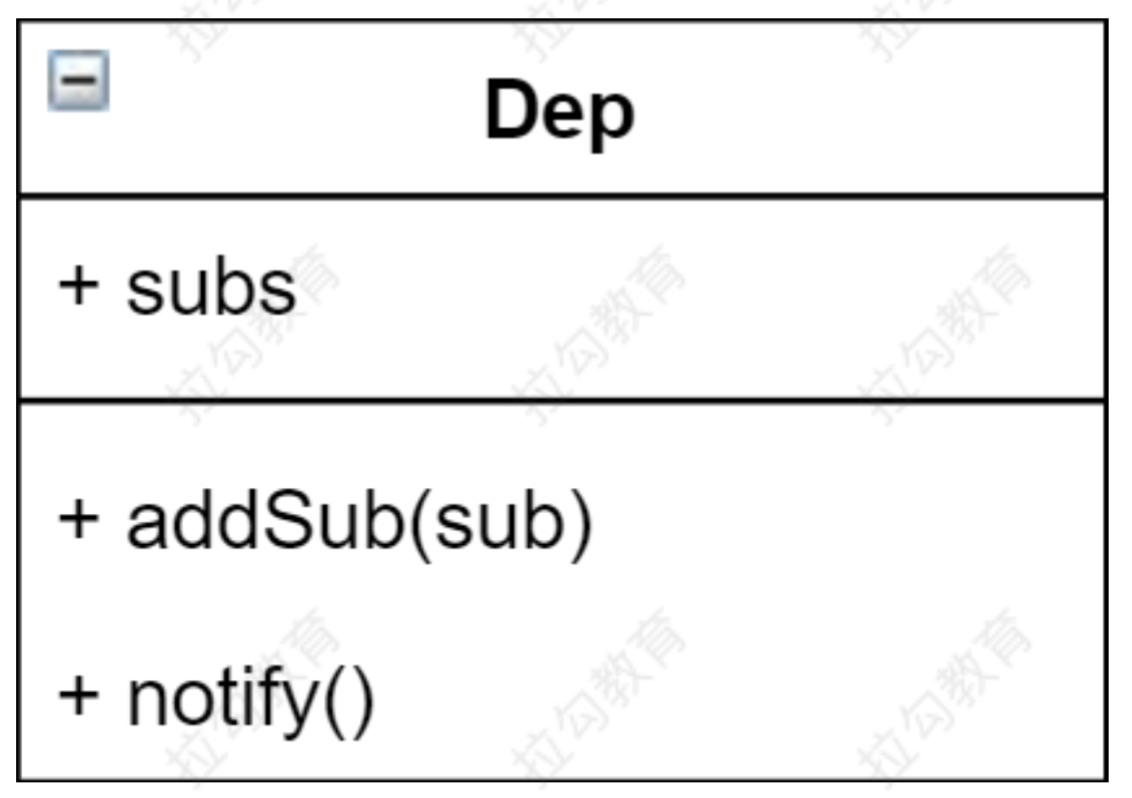
- 目标(发布者) -- Dep
- subs 数组:存储所有的观察者
- addSub:添加观察者
- notify:当事件发生,调用所有观察者的 update方法
- 没有事件中心
代码实现
<!DOCTYPE html>
<html lang="en">

<head>
  <meta charset="UTF-8">
  <meta name="viewport" content="width=device-width, initial-scale=1.0">
  <title>观察者模式</title>
</head>

<body>
  <script>
    // 发布者-目标
    class Dep {
      constructor() {
        // 记录所有的订阅者
        this.subs = []
      }
      // 添加订阅者
      addSub(sub) {
        if (sub && sub.update) {
          this.subs.push(sub)
        }
      }
      // 发布通知
      notify() {
        this.subs.forEach(sub => {
          sub.update()
        })
      }
    }
    // 订阅者-观察者
    class Watcher {
      update() {
        console.log('update')
      }
    }

    // 测试
    let dep = new Dep()
    let watcher = new Watcher()

    dep.addSub(watcher)

    dep.notify()
  </script>
</body>
</html>
vue 响应式原理模拟
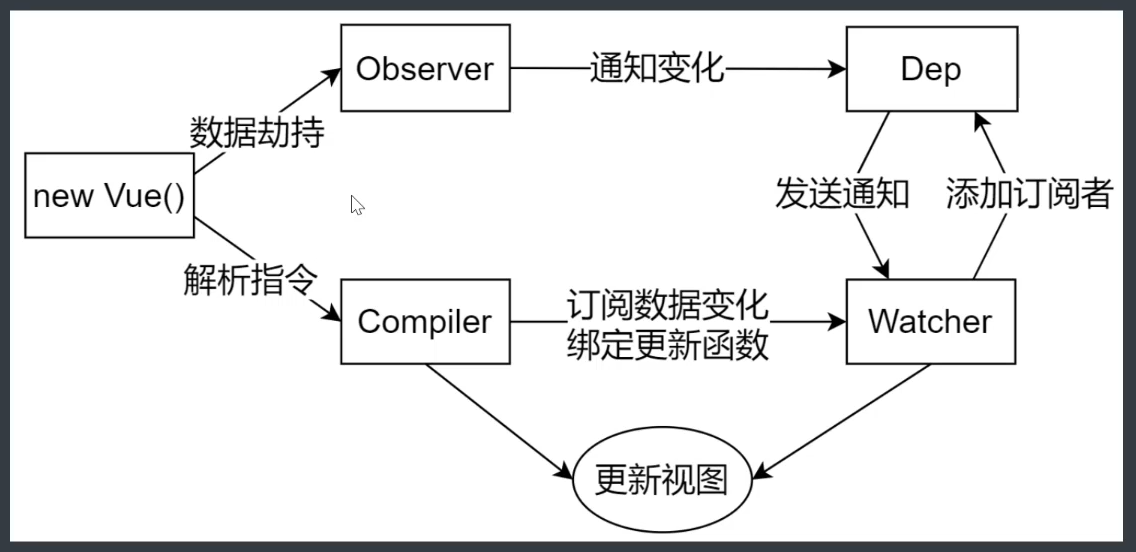
整体分析
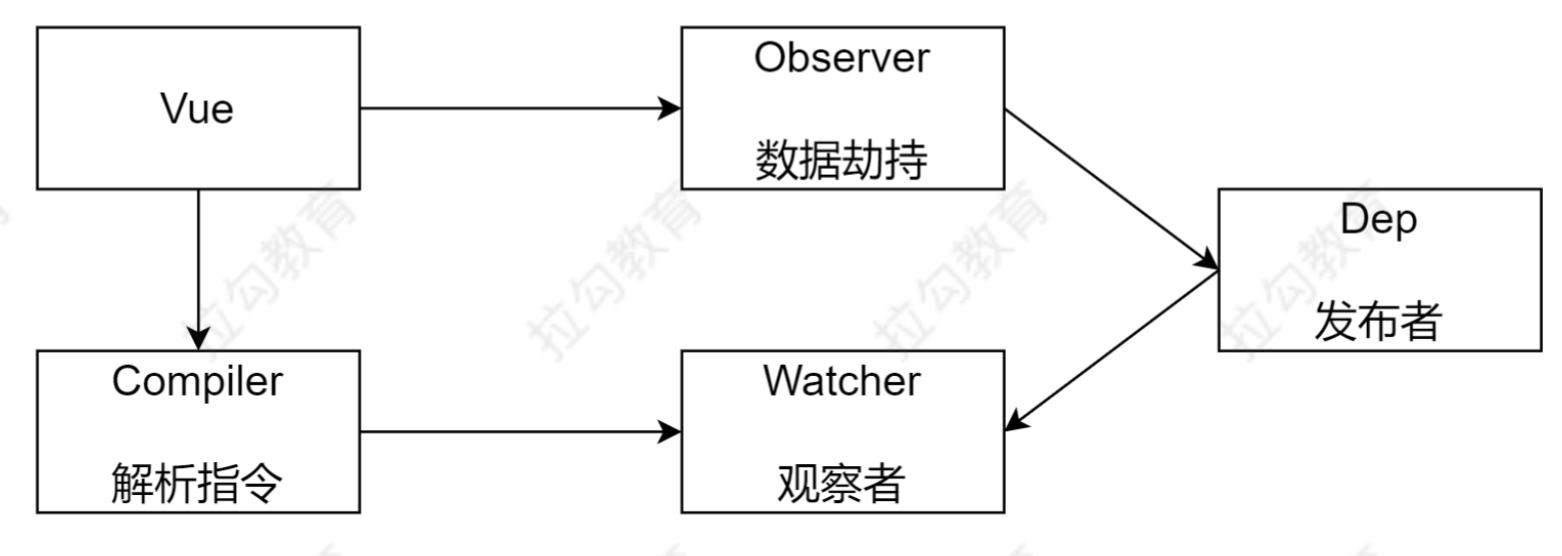
Vue
把 data 中的成员注入到 vue 实例,并且把 data 中的成员转成 getter/setter
Observer
能够对数据对象的所有属性进行监听,如果有变动可拿到最新值并通知 Dep
Compiler
解析每个元素中的指令 / 插值表达式,并替换成相应的数据
Dep
添加观察者,当数据变化通知所有观察者
Watcher
数据变化更新视图
Vue 类
功能
- 负责接受初始化的参数 (选项)
- 负责把 data 中的属性注入到 Vue 实例,转换成 getter / setter
- 负责调用 observer 监听 data 中所有属性的变化
- 负责调用 compiler 解析指令 / 插值表达式
结构
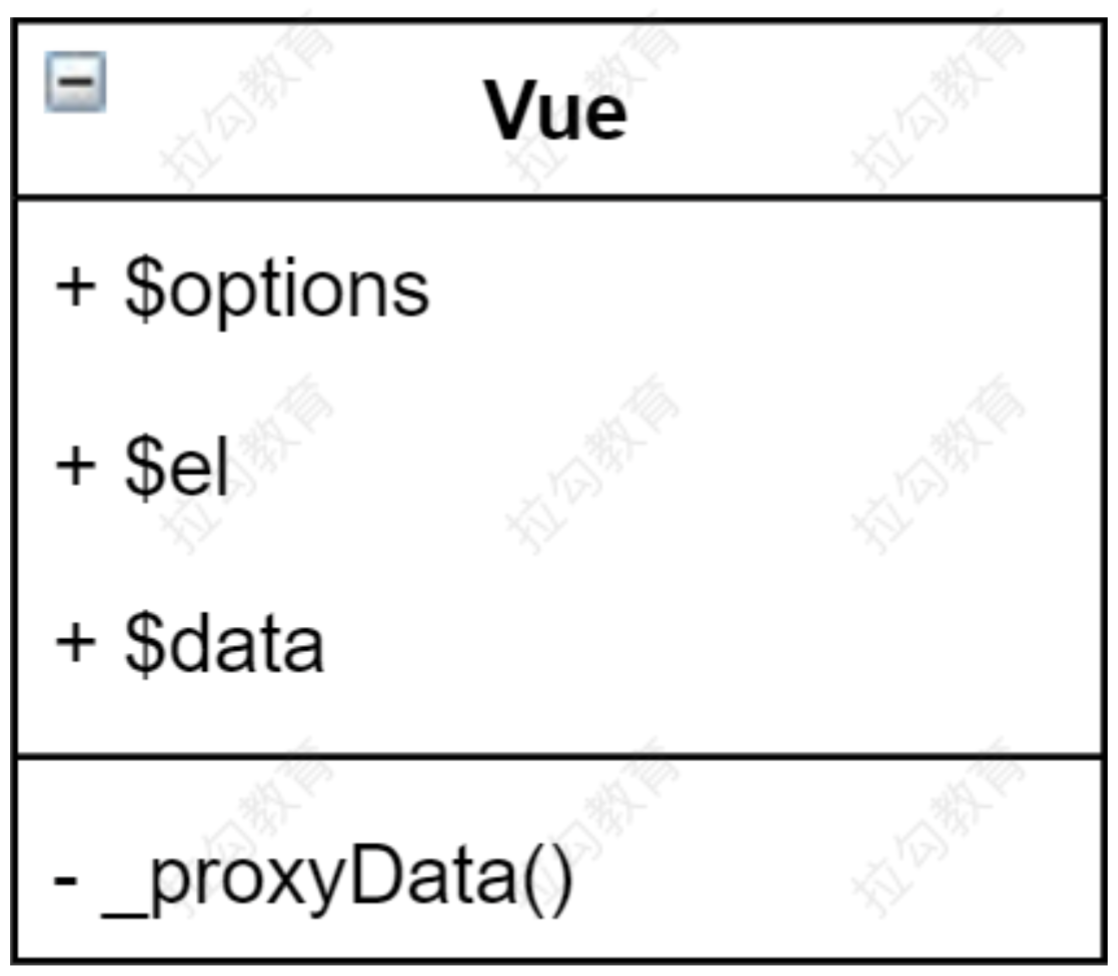
具体实现
class Vue {
  constructor (options) {
    // 1. 通过属性保存选项的数据
    this.$options = options || {}
    this.$data = options.data || {}
    this.$el = typeof options.el === 'string' ? document.querySelector(options.el) : options.el
    // 2. 把data中的成员转换成getter和setter,注入到vue实例中
    this._proxyData(this.$data)
    // 3. 调用observer对象,监听数据的变化
    new Observer(this.$data)
    // 4. 调用compiler对象,解析指令和差值表达式
    new Compiler(this)
  }
  _proxyData (data) {
    // 遍历data中的所有属性
    Object.keys(data).forEach(key => {
      // 把data的属性注入到vue实例中
      Object.defineProperty(this, key, {
        enumerable: true,
        configurable: true,
        get () {
          return data[key]
        },
        set (newValue) {
          if (newValue === data[key]) {
            return
          }
          data[key] = newValue
        }
      })
    })
  }
}
Observer 类
功能
- 负责把 data 选项中的属性转换成响应式数据
- data 中的某个属性也是对象,把该属性转换成响应式数据
- 数据变化发送通知
结构

具体实现
class Observer {
  constructor(data) {
    this.walk(data);
  }
  walk(data) {
    if (!data || typeof data !== "object") return;
    Object.keys(data).forEach((key) => {
      this.defineReactive(data, key, data[key]);
    });
  }
  defineReactive(obj, key, val) {
    const _this = this;
    // 如果val是对象,把val内部的属性转换成响应式数据
    this.walk(val);
    // 为每一个响应式对象添加一个观察者数组
    let dep = new Dep();
    Object.defineProperty(obj, key, {
      configurable: true,
      enumerable: true,
      get() {
        Dep.target && dep.addSub(Dep.target);
        return val;
      },
      set(newVal) {
        if (newVal === val) return;
        val = newVal;
        // 如果新赋值的值是一个对象,把val内部的属性转换成响应式数据
        _this.walk(val);

        // 通知观察者更新视图
        dep.notify();
      }
    });
  }
}
Compiler 类
功能
- 负责编译模版,解析指令 / 插值表达式
- 负责页面的首次渲染
- 当数据变化后重新渲染视图
结构
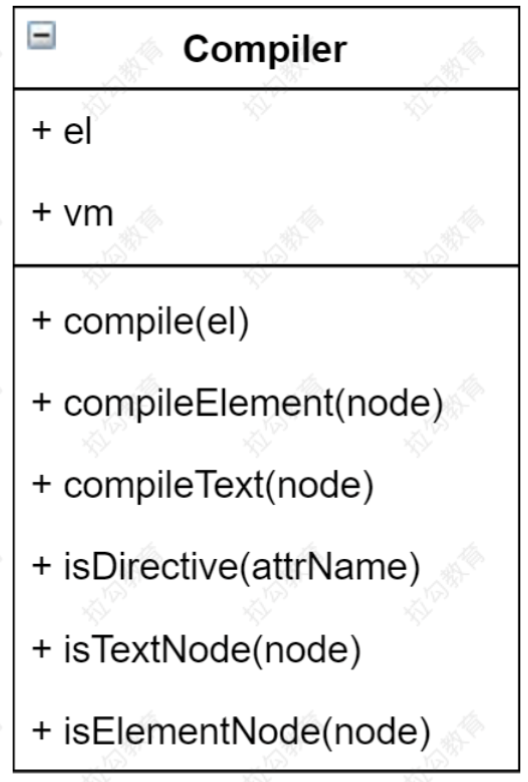
具体实现
class Compiler {
  constructor(vm) {
    this.el = vm.$el;
    this.vm = vm;
    this.compile(this.el);
  }
  // 编译模板,处理文本节点和元素节点
  compile(el) {
    const childNodes = el.childNodes;
    [...childNodes].forEach((node) => {
      // 如果是文本节点
      if (this.isTextNode(node)) {
        this.compileText(node);
      // 如果是元素节点
      } else if (this.isElementNode(node)) {
        this.compileElement(node);
      }
      // 判断node节点,是否有子节点,如果有子节点,要递归调用compile
      if (node.childNodes && node.childNodes.length) {
        this.compile(node);
      }
    });
  }

  // 编译元素节点,处理指令
  compileElement(node) {
    // console.log('GodX------>log',[...node.attributes]);
    [...node.attributes].forEach((attr) => {
      if (this.isDirective(attr.name)) {
        // v-text => text
        const attrName = attr.name.substr(2);
        // data 对象中的 key
        const key = attr.value;
        // 更新视图
        this.update(node, key, attrName);
      }
    });
  }

  update(node, key, attrName) {
    const fn = this[attrName + "Updater"];
    fn && fn(node, this.vm[key]);
  }

  // 处理 v-text
  textUpdater(node, value) {
    node.textContent = value;
  }

  // 处理 v-model
  modelUpdater(node, value) {
    // 更改表单属性的值是 value
    node.value = value;
  }

  // 编译文本节点,处理差值表达式
  compileText(node) {
    // console.dir(node);
    // 定义用来匹配插值表达式的正则
    const reg = /\{\{ (.+?) \}\}/;
    // 获取差值表达式:{{ xx }}
    let value = node.textContent;
    // 如果文本类型是插值表达式
    if (reg.test(value)) {
      // 获取差值表达式中的 key,并去除空格
      const key = RegExp.$1.trim();
      // 将匹配到的 key 替换为 value
      node.textContent = value.replace(reg, this.vm[key]);
    }
  }

  // 判断元素属性是否是指令
  isDirective(attrName) {
    return attrName.startsWith("v-");
  }

  // 判断节点是否是文本节点
  isTextNode(node) {
    return node.nodeType === 3;
  }

  // 判断节点是否是元素节点
  isElementNode(node) {
    return node.nodeType === 1;
  }
}
相关信息
到此,页面首次渲染把数据更新到视图功能已实现。接下来我们来实现 vue 的 响应式机制。
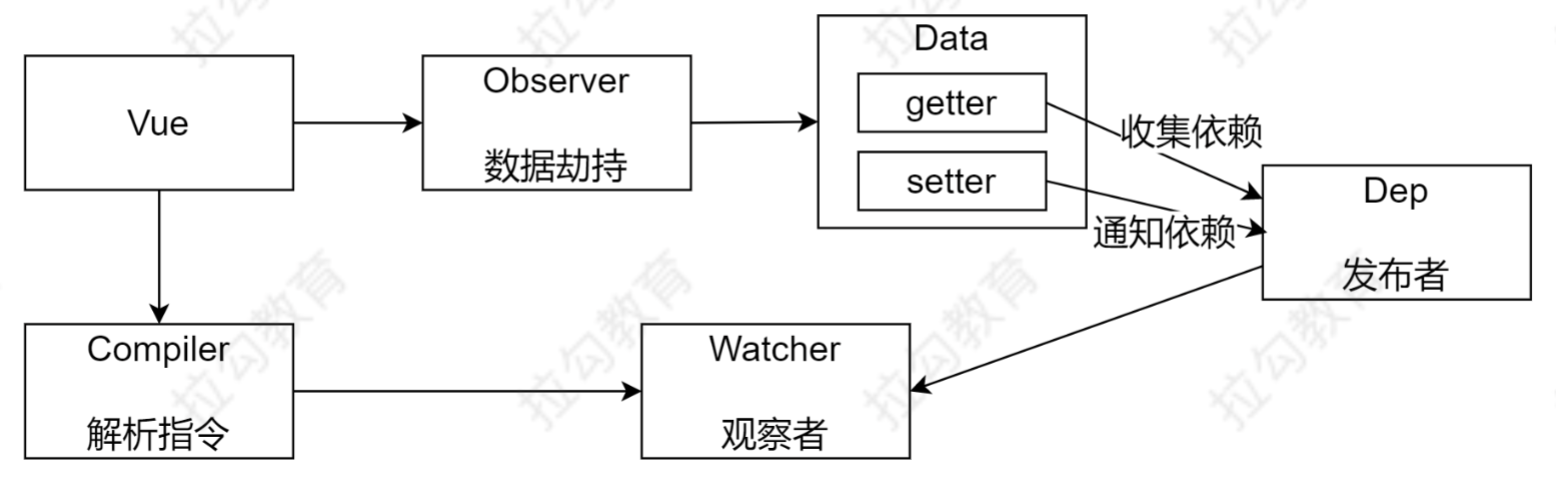
Dep 类
功能
- 在 getter 中收集依赖,添加观察者 (watcher)
- 在 setter 中通知所有观察者,更新视图
结构
具体实现
class Dep {
  constructor () {
    // 存储所有的观察者
    this.subs = []
  }
  // 添加观察者
  addSub (sub) {
    if (sub && sub.update) {
      this.subs.push(sub)
    }
  }
  // 发送通知
  notify () {
    this.subs.forEach(sub => {
      sub.update()
    })
  }
}
watcher 类
功能
- 当数据变化触发依赖,dep 通知所有的 Watcher 实例更新视图
- 自身实例化的时候往 dep 对象中添加自己
结构
具体实现
class Watcher {
  constructor(vm, key, cb) {
    this.vm = vm;
    this.key = key;

    // 回调函数负责更新视图
    this.cb = cb;
    // 将 watcher 对象记录到 Dep 类的静态属性
    Dep.target = this;

    // 读取 vm[key] ,触发 getter
    this.oldValue = vm[key];

    // 重置 Dep.target,以免重复添加
    Dep.target = null;
  }

  update() {
    const newValue = this.vm[this.key];

    if (newValue === this.oldValue) return;

    this.cb(newValue);
  }
}
修改 compiler 类(实现响应式机制)
首次渲染时,给不同的元素注册 Watcher 实例
update(node, key, attrName) {
    const fn = this[attrName + "Updater"];
    fn && fn.apply(this, [node, this.vm[key], key]);
  }

  // 处理 v-text
  textUpdater(node, value, key) {
    node.textContent = value;

    new Watcher(this.vm, key, (newVal) => {
      node.textContent = newVal;
    });
  }

  // 处理 v-model
  modelUpdater(node, value, key) {
    // 更改表单属性的值是 value
    node.value = value;

    new Watcher(this.vm, key, (newVal) => {
      node.value = newVal;
    });

    // 视图改变,更新数据
    window.addEventListener("input", () => {
      this.vm[key] = node.value;
    });
  }

  // 编译文本节点,处理差值表达式
  compileText(node) {
    // console.dir(node);
    // 定义用来匹配插值表达式的正则
    const reg = /\{\{ (.+?) \}\}/;
    // 获取差值表达式:{{ xx }}
    let value = node.textContent;
    // 如果文本类型是插值表达式
    if (reg.test(value)) {
      // 获取差值表达式中的 key,并去除空格
      const key = RegExp.$1.trim();
      // 将匹配到的 key 替换为 value
      node.textContent = value.replace(reg, this.vm[key]);

      new Watcher(this.vm, key, (newVal) => {
        node.textContent = newVal;
      });
    }
  }
总结
- 页面首次加载时,通过 Compiler 去渲染视图
- 当数据变化时,通过 Watcher 的 update 方法去更新视图
Powered by Waline v3.3.0